
作者:k0shl
转载请注明出处,作者博客:https://whereisk0shl.top
0x01 前言
上周五,Nikolenko在twitter上公开了Ubuntu 16.04下的提权漏洞exploit,影响范围还是挺大的,看到朋友圈很多小伙伴在自己的云服务器上测试都可以完成提权,关于这个漏洞的影响范围还是参照对应的文档。我对这个漏洞进行了简单分析。
这个漏洞是BPF中的bpf_insn结构的问题,用户可以定义这个结构,并通过prog相关函数向内核提交相关的opcode,offset,imm等信息,而在ebpf内核验证器会调用bpf_check()函数对bpf_insn进行检查,由于对bpf_insn的成员变量字节码的控制不严格,主要是src_reg和dst_reg的控制不严格,导致可以对内核栈越界操作,从而可以利用write socket中bpf某个opcode操作特性来完成任意地址读写。
我也是刚刚接触Linux内核的分析,因此可能研究还不够深入,也希望师傅们能够交流讨论,感谢阅读!
调试环境:
Ubuntu 16.04.1
Linux ubuntu 4.4.98 #1 SMP Fri Mar 16 08:06:16 PDT 2018 x86_64 x86_64 x86_64 GNU/Linux
0x02 Linux内核调试环境搭建
在搭建内核调试环境的时候碰到了一些坑,这里和大家总结分享一下,linux远程调试有很多种方法,我常用的是qemu+gdb或者vmware+gdb,在这个漏洞中我使用的是vmware+gdb的调试方法,qemu配置启动项之类的有点麻烦,所以选了这个vmware。
内核编译同样有几种方法,上周看到了张银奎老师关于Linux调试的文章,受益匪浅,于是选择了拉取内核符号文件的方法,这种方法相比编译内核来说,能够获取更精准的小版本号,还是挺方便的。我在下载符号文件的时候由于网速问题,我最后还是采取内核编译的方法,这个方法网上很多资料,就不再详细赘述。
编译完成内核后,就是宿主机gdb通过target remote连接通信了,这里我最开始采用的是网上的方法,修改.vmx文件,添加debugStub.listen.guest64="1"方法,但是在gdb连接的时候会有问题,换了几个gdb版本问题还都不一样,最后采用串口连接的方式。
在Vmware添加串口/tmp/serialport,之后用socat -d -d /tmp/serialport PTY,连接成功后会打开/dev/pty/xx串口,之后用gdb连接就可以了。另外调试系统需要在grub中添加增加调试启动项,可以增加menuconfig或者修改一个menuconfig
kgdbwait kgdb8250=io,03f8,ttyS0,115200,4 kgdboc=ttyS0,115200 kgdbcon
0x03 预备知识
BPF是一种常用的网络包过滤器,网上关于BPF以及extended BPF(eBPF)的描述在这里不进行赘述了,关于这个漏洞,我们需要了解两个数据结构,一个是bpf_map,这个数据结构被定义在include/linux/bpf.h中
struct bpf_map {
    atomic_t refcnt;
    enum bpf_map_type map_type;
    u32 key_size;
    u32 value_size;
    u32 max_entries;
    u32 pages;
    struct user_struct *user;
    const struct bpf_map_ops *ops;
    struct work_struct work;
    atomic_t usercnt;
};
另一个是eBPF的数据结构bpf_insn,它被定义在include/uapi/bpf.h中
struct bpf_insn {
    __u8    code;       /* opcode */
    __u8    dst_reg:4;  /* dest register */
    __u8    src_reg:4;  /* source register */
    __s16   off;        /* signed offset */
    __s32   imm;        /* signed immediate constant */
};
首先map作为ebpf和外部数据交互的重要数据结构,用户可以对map进行操作,比如写入特定值和读取特定值,从而实现对map的管理,这个条件很重要,是最后实现data-only attack的中间部件,而bpf_insn是prog中的一个重要数据结构,它可以通过bpf_prog_load函数,将用户态的字节码交给内核,同时在这个函数中会执行bpf_check(),对insn的字节码进行检验,这部分实现在kernel/bpf/syscall.c中
static int bpf_prog_load(union bpf_attr *attr)
{
    enum bpf_prog_type type = attr->prog_type;
    struct bpf_prog *prog;
    int err;
    char license[128];
    bool is_gpl;

……

    /* run eBPF verifier */
    err = bpf_check(&prog, attr);
    if (err < 0)
        goto free_used_maps;

……
}
其他关于bpf的信息可以看一下参考文章,以及一些重要的数据结构部分会在漏洞分析中提到。另外这里要提一下Linux内核栈,在Linux内核栈和thread_info,这个结构体被定义在linux/include/linux/sched.h
union thread_union {
    struct thread_info thread_info;
    unsigned long stack[THREAD_SIZE/sizeof(long)];
};
通过获取当前内核栈栈帧,就可以直接读取到thread_info,而task_struct就存放在thread_info中,关于内核栈更多的信息可以参考参考文章。
接下来我们进入漏洞利用分析。
0x04 漏洞分析及利用
首先我们分析一下Nikolenko的exploit,在exploit分为两部分,第一部分在prep()函数,第二部分在pwn()函数,在prep函数中,Nikolenko初始化了bpf_map和bpf_attr,这个bpf_attr是一个bpf的主要数据结构,其中包含了我们提到的bpf_insn,这个定义在 include/uapi/linux/bpf.h中
union bpf_attr {
    struct { /* anonymous struct used by BPF_MAP_CREATE command */
        __u32   map_type;   /* one of enum bpf_map_type */
        __u32   key_size;   /* size of key in bytes */
        __u32   value_size; /* size of value in bytes */
        __u32   max_entries;    /* max number of entries in a map */
    };

    struct { /* anonymous struct used by BPF_MAP_*_ELEM commands */
        __u32       map_fd;
        __aligned_u64   key;
        union {
            __aligned_u64 value;
            __aligned_u64 next_key;
        };
        __u64       flags;
    };

    struct { /* anonymous struct used by BPF_PROG_LOAD command */
        __u32       prog_type;  /* one of enum bpf_prog_type */
        __u32       insn_cnt;
        __aligned_u64   insns;
        __aligned_u64   license;
        __u32       log_level;  /* verbosity level of verifier */
        __u32       log_size;   /* size of user buffer */
        __aligned_u64   log_buf;    /* user supplied buffer */
        __u32       kern_version;   /* checked when prog_type=kprobe */
    };

    struct { /* anonymous struct used by BPF_OBJ_* commands */
        __aligned_u64   pathname;
        __u32       bpf_fd;
    };
} __attribute__((aligned(8)));
Nikolenko通过bpf_prog_load,将insn提交给内核,随后执行
setsockopt(sockets[1], SOL_SOCKET, SO_ATTACH_BPF, &progfd, sizeof(progfd))
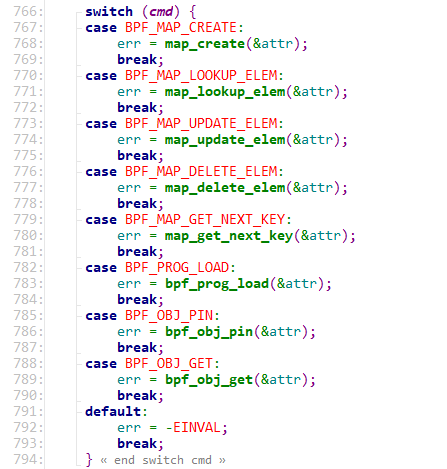
完成socket过滤器的初始化,关于bpf的系统调用的实现在kernel/bpf/syscall.c中,关于prep()和pwn()中的系统调用实现都在这个switch中。
接下来我们来看pwn部分是如何完成data-only attack EoP的,这也是漏洞的原因所在,在这部分中,我先和大家分享一下漏洞利用分析,再分享一下提权的整个过程。
第一部分,我们可以关注到在exploit中两个值得关注的函数bpf_update_elem和bpf_lookup_elem,这两个函数有点像Windows内核利用GDI data-only attack时的函数SetBitmapBits和GetBitmapBits,是实现任意地址读写的关键函数,但不是触发漏洞的,这两个函数可以直接操作bpf_map,两个相关实现在swtich语句中。这两个函数的具体实现都在kernel/bpf/syscall.c中。
    case BPF_MAP_LOOKUP_ELEM:
        err = map_lookup_elem(&attr);
        break;
    case BPF_MAP_UPDATE_ELEM:
        err = map_update_elem(&attr);
在详解这两个函数前我需要介绍一下bpf_attr中关于BPF_MAP_*_ELEM的几个关键结构。
    struct { /* anonymous struct used by BPF_MAP_*_ELEM commands */
        __u32       map_fd;
        __aligned_u64   key;
        union {
            __aligned_u64 value;
            __aligned_u64 next_key;
        };
        __u64       flags;
    };
其中key代表索引,value代表值,这两个值都可以通过bpf_attr结构在用户层指定,在map_lookup_elem中
static int map_lookup_elem(union bpf_attr *attr)
{
    void __user *ukey = u64_to_ptr(attr->key);//获取用户定义bpt_attr的key索引
    void __user *uvalue = u64_to_ptr(attr->value);//获取用户定义的bpf_attr的value
    ……
    if (copy_from_user(key, ukey, map->key_size) != 0)//拷贝用户指定的索引
        goto free_key;
    ……
    rcu_read_lock();
    ptr = map->ops->map_lookup_elem(map, key);//关键!后面会讲到
    if (ptr)
        memcpy(value, ptr, map->value_size);//拷贝用户索引在map中的值到value中
    rcu_read_unlock();
    ……
    if (copy_to_user(uvalue, value, map->value_size) != 0)//从内核空间拷贝至用户空间,更新value
        goto free_value;
    ……
}
而在map_update_elem中
static int map_update_elem(union bpf_attr *attr)
{
    void __user *ukey = u64_to_ptr(attr->key);//获取用户定义bpt_attr的key索引
    void __user *uvalue = u64_to_ptr(attr->value);//获取用户定义的bpf_attr的value
……
if (copy_from_user(key, ukey, map->key_size) != 0)//从用户空间拷贝索引
        goto free_key;

……
    if (copy_from_user(value, uvalue, map->value_size) != 0)//从用户空间拷贝value
        goto free_value;

    /* eBPF program that use maps are running under rcu_read_lock(),
     * therefore all map accessors rely on this fact, so do the same here
     */
    rcu_read_lock();
    err = map->ops->map_update_elem(map, key, value, attr->flags);//关键!后面会提到
    rcu_read_unlock();
……
}
在lookup和update两个函数中都调用到了map->ops的操作,这是一个bpf_map_ops结构体,定义在include/linux/bpf.h中
struct bpf_map_ops {
    /* funcs callable from userspace (via syscall) */
    struct bpf_map *(*map_alloc)(union bpf_attr *attr);
    void (*map_free)(struct bpf_map *);
    int (*map_get_next_key)(struct bpf_map *map, void *key, void *next_key);

    /* funcs callable from userspace and from eBPF programs */
    void *(*map_lookup_elem)(struct bpf_map *map, void *key);
    int (*map_update_elem)(struct bpf_map *map, void *key, void *value, u64 flags);
    int (*map_delete_elem)(struct bpf_map *map, void *key);

    /* funcs called by prog_array and perf_event_array map */
    void *(*map_fd_get_ptr) (struct bpf_map *map, int fd);
    void (*map_fd_put_ptr) (void *ptr);
};
在动态调试的时候可以跟踪到ops函数调用的汇编代码,直接步入之后可以定位到map->ops的源码
   0xffffffff8117874c <+1052>:  mov    0x20(%r13),%rax
   0xffffffff81178750 <+1056>:  mov    %r12,%rsi
   0xffffffff81178753 <+1059>:  mov    %r13,%rdi
   0xffffffff81178756 <+1062>:  mov    0x18(%rax),%rax
   0xffffffff8117875a <+1066>:  callq  0xffffffff818538d0 <__x86_indirect_thunk_rax>
(gdb) si
array_map_lookup_elem (map=0xffff880023e83f00, key=0xffff880078862ba8)
    at kernel/bpf/arraymap.c:66
66  {
源码部分定义在kernel/bpf/arraymap.c中,相关函数是array_map_lookup_elem和array_map_update_elem,这两个函数在arraymap.c中的实现逻辑很简单
static void *array_map_lookup_elem(struct bpf_map *map, void *key)
{
    struct bpf_array *array = container_of(map, struct bpf_array, map);
    u32 index = *(u32 *)key;

    ……//check

    return array->value + array->elem_size * index;
}

static int array_map_update_elem(struct bpf_map *map, void *key, void *value,
                 u64 map_flags)
{
    struct bpf_array *array = container_of(map, struct bpf_array, map);
    u32 index = *(u32 *)key;

    ……//check

    memcpy(array->value + array->elem_size * index, value, map->value_size);
    return 0;
}
在这两个函数中,lookup会返回key索引对应map位置的value值,而update会更新value值到key索引对应map位置,我在update和lookup下了断点跟踪,Nikolenko的exploit中对每次对map的key索引0、1、2进行了3次update,然后在read功能中进行了lookup读取key索引为2的值。
首先我跟踪了获取task_struct时的第二次、第三次update,这个目的是通过内核栈帧获取task_struct的值,根据exploit的逻辑,这里写入map的值应该是0,内核栈帧,0。
(gdb) c//第二次update
Continuing.

Breakpoint 7, array_map_update_elem (map=0xffff880023e83f00,
    key=<optimized out>, value=0xffff880078862b40, map_flags=0)
    at kernel/bpf/arraymap.c:114
114     memcpy(array->value + array->elem_size * index, value, map->value_size);

(gdb) i r rdi
rdi            0xffff880023e83f00   -131940792910080
(gdb) x/10g 0xffff880023e83f50
0xffff880023e83f50: 0x0000000000000008  0x0000000000000000
0xffff880023e83f60: 0x0000000000000000  0x0000000000000000

//返回时,update已经写入
(gdb) ni
115     return 0;
(gdb) x/10g 0xffff880023e83f50
0xffff880023e83f50: 0x0000000000000008  0x0000000000000000
0xffff880023e83f60: 0x0000000000000000  0xffff880068638000//写入了栈帧值
//再跟一下第三次写入
(gdb) c
Continuing.

Breakpoint 5, array_map_update_elem (map=0xffff880023e83f00,
    key=0xffff880078862b20, value=0xffff880078862e20, map_flags=0)
    at kernel/bpf/arraymap.c:98
98  {
(gdb) x/g 0xffff880078862e20//第三次写入的值是0
0xffff880078862e20: 0x0000000000000000

//第三次写入后map对应索引位置的值是
(gdb) x/10g 0xffff880023e83f50
0xffff880023e83f50: 0x0000000000000008  0x0000000000000000
0xffff880023e83f60: 0x0000000000000000//第一次update写入的0
0xffff880023e83f68:   0xffff880068638000//第二次update写入的栈帧
0xffff880023e83f70:   0x0000000000000000//第三次update写入的0
之后我命中了lookup的断点,按照exploit的定义,这里应该是读取key索引为2的值,按照刚才update跟踪的内容,在key索引为2的地方值应该为0,但在lookup时,这个位置的值变化了。
(gdb) si

Breakpoint 10, array_map_lookup_elem (map=0xffff880023e83f00,
    key=0xffff880078862b40) at kernel/bpf/arraymap.c:74
74  }
(gdb) i r rax
rax            0xffff880023e83f70   -131940792909968
(gdb) x 0xffff880023e83f70
0xffff880023e83f70: 0xffff88006869ad00//对应位置的值变成了task_struct的值
这里在key索引为1的位置存放的内核栈帧中存放的task_struct的值已经被存放在key索引为2的位置,这就是由于漏洞产生的。
为了跟踪到发生这个问题的原因,我们可以这么下断点。
(gdb) watch *0xffff880023e83f70重新跟踪update的内容,发现在update之后,lookup之前会命中内存写入断点,0xffff880023e83f70位置发生了写入操作。
(gdb) c
Continuing.

Program received signal SIGTRAP, Trace/breakpoint trap.
0xffffffff81177518 in __bpf_prog_run (ctx=0xffff880023e83f00,
    insn=0xffffc90001650140) at kernel/bpf/core.c:856
856     LDST(DW, u64)
(gdb) x/30g 0xffff880023e83f00
0xffff880023e83f00: 0x0000000200000002  0x0000000800000004
0xffff880023e83f10: 0x0000000100000003  0xffff88007974a080
0xffff880023e83f20: 0xffffffff81a257e0  0x0000000000000000
0xffff880023e83f30: 0x0000000000000000  0x0000000000000000
0xffff880023e83f40: 0x0000000000000000  0x0000000000000001
0xffff880023e83f50: 0x0000000000000008  0x0000000000000000
0xffff880023e83f60: 0x0000000000000000  0xffff88006869b2f8
0xffff880023e83f70: 0xffff88004d916600//task_struct写入
到这里终于跟踪到了漏洞利用的关键位置,这里是opcode的LDST操作码,在这里可以完成整个内存的任意地址读写。而这个位置就是在exploit中writemsg()函数中触发的,问题发生在__bpf_prog_run函数中,这个函数定义在kernel/bpf/core.c中。
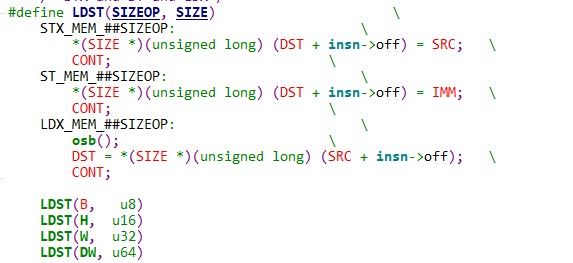
在LDST根据insn字节码对BPF regs操作的过程中,可以通过LDX_MEM读取任意内存地址,存入内核栈regs中,而STX_MEM可以将内核栈regs中的值写入任意地址,来看一下由write socket触发的栈回溯。
(gdb) bt
#0  0xffffffff81177518 in __bpf_prog_run (ctx=0xffff880023e83f00,
    insn=0xffffc90001650140) at kernel/bpf/core.c:856
#1  0xffffffff81757b01 in bpf_prog_run_save_cb (skb=<optimized out>,
    prog=<optimized out>) at include/linux/filter.h:379
#2  sk_filter_trim_cap (sk=<optimized out>, skb=0xffff880052cf1d00, cap=0)
    at net/core/filter.c:87
#3  0xffffffff817e9c7a in sk_filter (skb=<optimized out>, sk=<optimized out>)
    at include/linux/filter.h:438
#4  unix_dgram_sendmsg (sock=0xffff880079ff8000, msg=<optimized out>, len=64)
    at net/unix/af_unix.c:1727
#5  0xffffffff81723bbe in sock_sendmsg_nosec (msg=<optimized out>,
    sock=<optimized out>) at net/socket.c:611
#6  sock_sendmsg (sock=0xffff880079ff8000, msg=0xffff88006863bdc0)
    at net/socket.c:621
#7  0xffffffff81723c55 in sock_write_iter (iocb=<optimized out>,
    from=0xffff88006863be70) at net/socket.c:819
#8  0xffffffff81213055 in new_sync_write (filp=0xffff880023e83f00,
    buf=<optimized out>, len=<optimized out>, ppos=0xffff880023e83f70)
    at fs/read_write.c:478
#9  0xffffffff812130c9 in __vfs_write (file=<optimized out>,
    p=<optimized out>, count=<optimized out>, pos=<optimized out>)
    at fs/read_write.c:491
#10 0xffffffff81213a79 in vfs_write (file=0xffff8800687b5900,
关于__bpf_prog_run定义在include\linux\filter.h中
#define BPF_PROG_RUN(filter, ctx)  (*filter->bpf_func)(ctx, filter->insnsi)
    res = BPF_PROG_RUN(prog, skb);
根据动态调试的结果,bpf_prog_run的ctx参数的值就是map的值,而insn参数的值就是之前我们定义的prog的值,在exploit中prog是经过精心构造的,在prog中,opcode的字节码要确保bpf_prog_run要进入LDST,在LDST中,DST和SRC的定义是这样的
#define DST regs[insn->dst_reg]
#define SRC regs[insn->src_reg]
regs对应内核栈位置是由insn->dst_reg和insn->src_reg确定的,因此,如果对这两个变量如果不加以控制会导致可以对内核栈regs之外越界进行操作,因为regs是在bpf_prog_run中定义的,它会在内核栈中被开辟,来看一下bpf_prog_run函数
static unsigned int __bpf_prog_run(void *ctx, const struct bpf_insn *insn)
{
    u64 stack[MAX_BPF_STACK / sizeof(u64)];
    u64 regs[MAX_BPF_REG], tmp; //regs被定义
    static const void *jumptable[256] = {//会根据insn的opcode跳转,这里要跳转到LDST
        [0 ... 255] = &&default_label,
        /* Now overwrite non-defaults ... */
        /* 32 bit ALU operations */
        [BPF_ALU | BPF_ADD | BPF_X] = &&ALU_ADD_X,
        [BPF_ALU | BPF_ADD | BPF_K] = &&ALU_ADD_K,
        [BPF_ALU | BPF_SUB | BPF_X] = &&ALU_SUB_X,
        [BPF_ALU | BPF_SUB | BPF_K] = &&ALU_SUB_K,
……
因此regs在内核栈上,而insn->off可以由用户层指定,我们可以跟踪到任意地址写的汇编代码逻辑
   0xffffffff81177545 <+3669>:  movzx  eax,BYTE PTR [rbx+0x1]//rbx为insn *prog
   0xffffffff81177549 <+3673>:  movsx  rcx,WORD PTR [rbx+0x2]
   0xffffffff8117754e <+3678>:  add    rbx,0x8
   0xffffffff81177552 <+3682>:  mov    rdx,rax
   0xffffffff81177555 <+3685>:  shr    al,0x4
   0xffffffff81177558 <+3688>:  and    eax,0xf
   0xffffffff8117755b <+3691>:  and    edx,0xf
   0xffffffff8117755e <+3694>:  mov    rax,QWORD PTR [rbp+rax*8-0x270]
   0xffffffff81177566 <+3702>:  mov    rax,QWORD PTR [rax+rcx*1]
   0xffffffff8117756a <+3706>:  mov    QWORD PTR [rbp+rdx*8-0x270],rax//任意地址读
=> 0xffffffff81177572 <+3714>:  jmp    0xffffffff81176740 <__bpf_prog_run+80>
其中rbx的值就是prog中定义的,rbx的值为
(gdb) i r rbx
rbx            0xffffc900005ed138   -60473133313736
(gdb) x 0xffffc900005ed138
0xffffc900005ed138: 0x000000000000327b
这个值在exploit中定义的prog中
char *__prog = ……
"\x7b\x32\x00\x00\x00\x00\x00\x00"
……
通过rbx可以获取到rax和rcx,rdx的值,offset可以通过insn在用户层定义,而既然ctx指针就是map指针,而ctx作为参数传入后又会在内核栈中,因此,LDX_MEM完成的是从内核栈中regs里的地址存放的值的读取到regs的地址,而STX_MEM则是将regs里的值写入regs里地址指向的位置,而由于src_reg和dst_reg未进行严格的检查,可以越界操作内核栈,这么说可能有点晕,后面会有动态调试的记录,看上去就很清晰了。
以下过程描述,都是基于对bpf_insn字节码的定义完成的,这个过程需要attacker对bpf_insn进行精心构造(如同本次漏洞分析exploit中的char *prog定义),才能确保在write socket的时候opcode跳转到正确的位置(LDST),并且读取精心构造的src_reg,dst_reg,offset的字节码完成利用。
过程是这样的,我们可以通过内核栈地址读从map中读取想要读的任意内存地址,存放在regs对应的内核栈地址中,然后再通过任意地址读,把regs对应内核栈中存放的任意内存地址的值读出来,再通过内核栈地址写,把这个值写回map中,最后通过map_lookup_elem获取到这个值。
同样,对任意地址写来说,就更加方便一些,我们只需要通过内核栈地址读,将想写入的地址和想写入的值从map中读出来,然后分别存入regs的内核栈空间中,之后通过内核栈地址写,将想写入的值写入内核栈地址存放的任意地址就可以了。
下面我们分别来看一下这个由于offset字节码没有做好控制,导致oob r/w的exploit过程,这里我不列举全部过程,首先来看一下pwn()中__get_fp()的过程,因为这里比较直观,frame pointer就保存在内核栈中,可以直接通过内核栈地址写,将这个值直接写到map中。
(gdb) c
Continuing.

Breakpoint 59, 0xffffffff81177504 in __bpf_prog_run (ctx=0xffff88007600c400,
    insn=0xffffc90000552158) at kernel/bpf/core.c:856
856     LDST(DW, u64)
(gdb) x/5i 0xffffffff81177504
=> 0xffffffff81177504 <__bpf_prog_run+3604>:
    mov    rcx,QWORD PTR [rbp+rcx*8-0x270]//读取要存放的地址,这里是map
   0xffffffff8117750c <__bpf_prog_run+3612>:
    mov    rax,QWORD PTR [rbp+rax*8-0x270]//越界读取内核栈framepointer的值
   0xffffffff81177514 <__bpf_prog_run+3620>:
    mov    QWORD PTR [rcx+rdx*1],rax//将frame pointer存入map,对应map的地址是key索引为2的地址
   0xffffffff81177518 <__bpf_prog_run+3624>:
    jmp    0xffffffff81176740 <__bpf_prog_run+80>
   0xffffffff8117751d <__bpf_prog_run+3629>:    movzx  eax,BYTE PTR [rbx+0x1]
(gdb) si
0xffffffff8117750c  856     LDST(DW, u64)
(gdb) i r rax
rax            0xa  10//rax存放的值为offset,这个值指向frame pointer
(gdb) si//单步步过后,frame pointer的值存放在rax,随后rax写入regs,之后map会读取key索引2读到frame pointer
0xffffffff81177514  856     LDST(DW, u64)
(gdb) i r rax
rax            0xffff88007311bc88   -131939464790904
(gdb) x/11g 0xffff88007311ba30//写入map前
0xffff88007311ba30: 0x0000000000000000  0xffff88007600c400
0xffff88007311ba40: 0xffff88007600c470//map的位置,key索引为2
0xffff88007311ba48:   0x0000000000000001
0xffff88007311ba50: 0xffff88007fffb7c0  0xffff88007311bc10
0xffff88007311ba60: 0x0000000000000001  0x0000000000000000
0xffff88007311ba70: 0x0000000000000000  0xffff88007600c400
0xffff88007311ba80: 0xffff88007311bc88//frame pointer在这里

(gdb) si//执行mov    QWORD PTR [rcx+rdx*1],rax,写入map
0xffffffff81177518  856     LDST(DW, u64)
(gdb) i r rcx//map地址
rcx            0xffff88007600c470   -131939415571344
(gdb) x 0xffff88007600c470//frame pointer写入map,可以通过key索引2读到
0xffff88007600c470: 0xffff88007311bc88
接下来再看看任意地址写,我们以最后一步,向cred结构中的uid中写0x0为例__write(uidptr, 0);
(gdb) x/5i 0xffffffff8117755e
=> 0xffffffff8117755e <__bpf_prog_run+3694>:    //读取内核栈中存放map的值
    mov    rax,QWORD PTR [rbp+rax*8-0x270]
   0xffffffff81177566 <__bpf_prog_run+3702>:    //读取map的值,这个key索引为1,这个值为cred->uid
    mov    rax,QWORD PTR [rax+rcx*1]
   0xffffffff8117756a <__bpf_prog_run+3706>:    //将map的值存入regs
    mov    QWORD PTR [rbp+rdx*8-0x270],rax
   0xffffffff81177572 <__bpf_prog_run+3714>:
    jmp    0xffffffff81176740 <__bpf_prog_run+80>
   0xffffffff81177577 <__bpf_prog_run+3719>:    movzx  eax,BYTE PTR [rbx+0x1]
(gdb) c
Continuing.

Breakpoint 60, 0xffffffff8117755e in __bpf_prog_run (ctx=0xffff88007600c400,
    insn=0xffffc900005520d8) at kernel/bpf/core.c:856
856     LDST(DW, u64)
 (gdb) si
0xffffffff81177566  856     LDST(DW, u64)
(gdb) si
0xffffffff8117756a  856     LDST(DW, u64)
(gdb) i r rax //从map中读取到用户层传入的cred->uid
rax            0xffff88007307d804   -131939465439228
(gdb) i r rdx //offset
rdx            0x7  7
 (gdb) x/8g 0xffff88007311ba30
0xffff88007311ba30: 0xffff88007600c468  0xffff88007600c400
0xffff88007311ba40: 0xffff88007311bc84  0xffff88007307d800
0xffff88007311ba50: 0xffff88007fffb7c0  0xffff88007311bc10
0xffff88007311ba60: 0x0000000000000002  0x0000000000000000//cred->uid写入的regs位置
 (gdb) si
0xffffffff81177572  856     LDST(DW, u64)
(gdb) x/8g 0xffff88007311ba30
0xffff88007311ba30: 0xffff88007600c468  0xffff88007600c400
0xffff88007311ba40: 0xffff88007311bc84  0xffff88007307d800
0xffff88007311ba50: 0xffff88007fffb7c0  0xffff88007311bc10
0xffff88007311ba60: 0x0000000000000002  0xffff88007307d804//cred->uid写入
 (gdb) c//接下来时从map中读取要向cred->uid写入的值
Continuing.

Breakpoint 60, 0xffffffff8117755e in __bpf_prog_run (ctx=0xffff88007600c400,
    insn=0xffffc90000552118) at kernel/bpf/core.c:856
856     LDST(DW, u64)
(gdb) si
0xffffffff81177566  856     LDST(DW, u64)
(gdb) si
0xffffffff8117756a  856     LDST(DW, u64)
(gdb) i r rax
rax            0x0  0
(gdb) si
0xffffffff81177572  856     LDST(DW, u64)
(gdb) x/9g 0xffff88007311ba30
0xffff88007311ba30: 0xffff88007600c470  0xffff88007600c400
0xffff88007311ba40: 0xffff88007311bc84  0xffff88007307d800
0xffff88007311ba50: 0xffff88007fffb7c0  0xffff88007311bc10
0xffff88007311ba60: 0x0000000000000002  0xffff88007307d804
0xffff88007311ba70: 0x0000000000000000  //value写入这里
(gdb) c//最后到达任意地址写
Continuing.

Breakpoint 59, 0xffffffff81177504 in __bpf_prog_run (ctx=0xffff88007600c400,
    insn=0xffffc90000552168) at kernel/bpf/core.c:856
856     LDST(DW, u64)
(gdb) x/5i 0xffffffff81177504
=> 0xffffffff81177504 <__bpf_prog_run+3604>:    //从内核栈regs中要写0的地址
    mov    rcx,QWORD PTR [rbp+rcx*8-0x270]
   0xffffffff8117750c <__bpf_prog_run+3612>:    //获取value
    mov    rax,QWORD PTR [rbp+rax*8-0x270]
   0xffffffff81177514 <__bpf_prog_run+3620>:    //向cred->uid中写0,获得root权限
    mov    QWORD PTR [rcx+rdx*1],rax
   0xffffffff81177518 <__bpf_prog_run+3624>:
    jmp    0xffffffff81176740 <__bpf_prog_run+80>
   0xffffffff8117751d <__bpf_prog_run+3629>:    movzx  eax,BYTE PTR [rbx+0x1]
(gdb) si
0xffffffff8117750c  856     LDST(DW, u64)
(gdb) si
0xffffffff81177514  856     LDST(DW, u64)
(gdb) i r rcx //从regs中获取到之前存放的cred->uid的地址
rcx            0xffff88007307d804   -131939465439228
(gdb) x/g 0xffff88007307d804//写入前,还是user权限
0xffff88007307d804: 0x000003e8000003e8
 (gdb) si
0xffffffff81177518  856     LDST(DW, u64)
(gdb) x/g 0xffff88007307d804//0已经写入,获得root权限
0xffff88007307d804: 0x0000000000000000
第二部分我来简述一下这个data-only attack的利用过程,data-only attack在这几年利用越来越成熟,因为它很方便,不需要shellcode,不需要ROP来disable SMEP,只需要通过某些数据结构的特性来完成提权利用。
在这个漏洞中,首先利用内核栈读取frame pointer,接下来通过frame pointer算出栈帧sp,而thread_info就保存在栈帧位置,这样通过任意地址读,来读取thread_info的值,再利用任意地址读获取task_struct,再以此法获取cred结构,最后向uid的位置写0x0,获取root权限。
这里在其他版本中,需要修改的就是cred offset,这个cred结构在task_struct中的偏移需要根据具体版本确定,关于task_struct的定义在include/linux/sche.h中
/* process credentials */
    const struct cred __rcu *ptracer_cred; /* Tracer's credentials at attach */
    const struct cred __rcu *real_cred; /* objective and real subjective task
                     * credentials (COW) */
    const struct cred __rcu *cred;  /* effective (overridable) subjective task
                     * credentials (COW) */
    char comm[TASK_COMM_LEN]; /* executable name excluding path
                     - access with [gs]et_task_comm (which lock
                       it with task_lock())
                     - initialized normally by setup_new_exec */
关于这个漏洞的修复可能还是需要在bpf_prog_load中的bpf_check直接对insn的字节码进行检查,主要还是对src_reg和dst_reg,以及offset的检查。
在这个漏洞利用中,利用了bpf_prog的特性完成了任意地址读写,在之前调试过的Linux内核洞中,多数都是采取传统的commit_creds(prepare_kernel_cred(0));方法,因此感觉这个漏洞及利用还是非常有意思的,感谢阅读!
0x05 参考文章
Ubuntu 16.04 exploit:http://cyseclabs.com/exploits/upstream44.c
CVE-2017-16995补丁:
https://github.com/torvalds/linux/commit/95a762e2c8c942780948091f8f2a4f32fce1ac6f
Linux内核调试环境搭建:http://advdbg.org/blogs/advdbg_system/articles/7147.aspx
关于BPF:http://blog.csdn.net/ljy1988123/article/details/50444693
关于内核栈:http://blog.csdn.net/tiankong_/article/details/75647488
感谢大佬,希望早日达到大佬的水平